
BBQitALL ring vs the Snake Method. Who Wins?
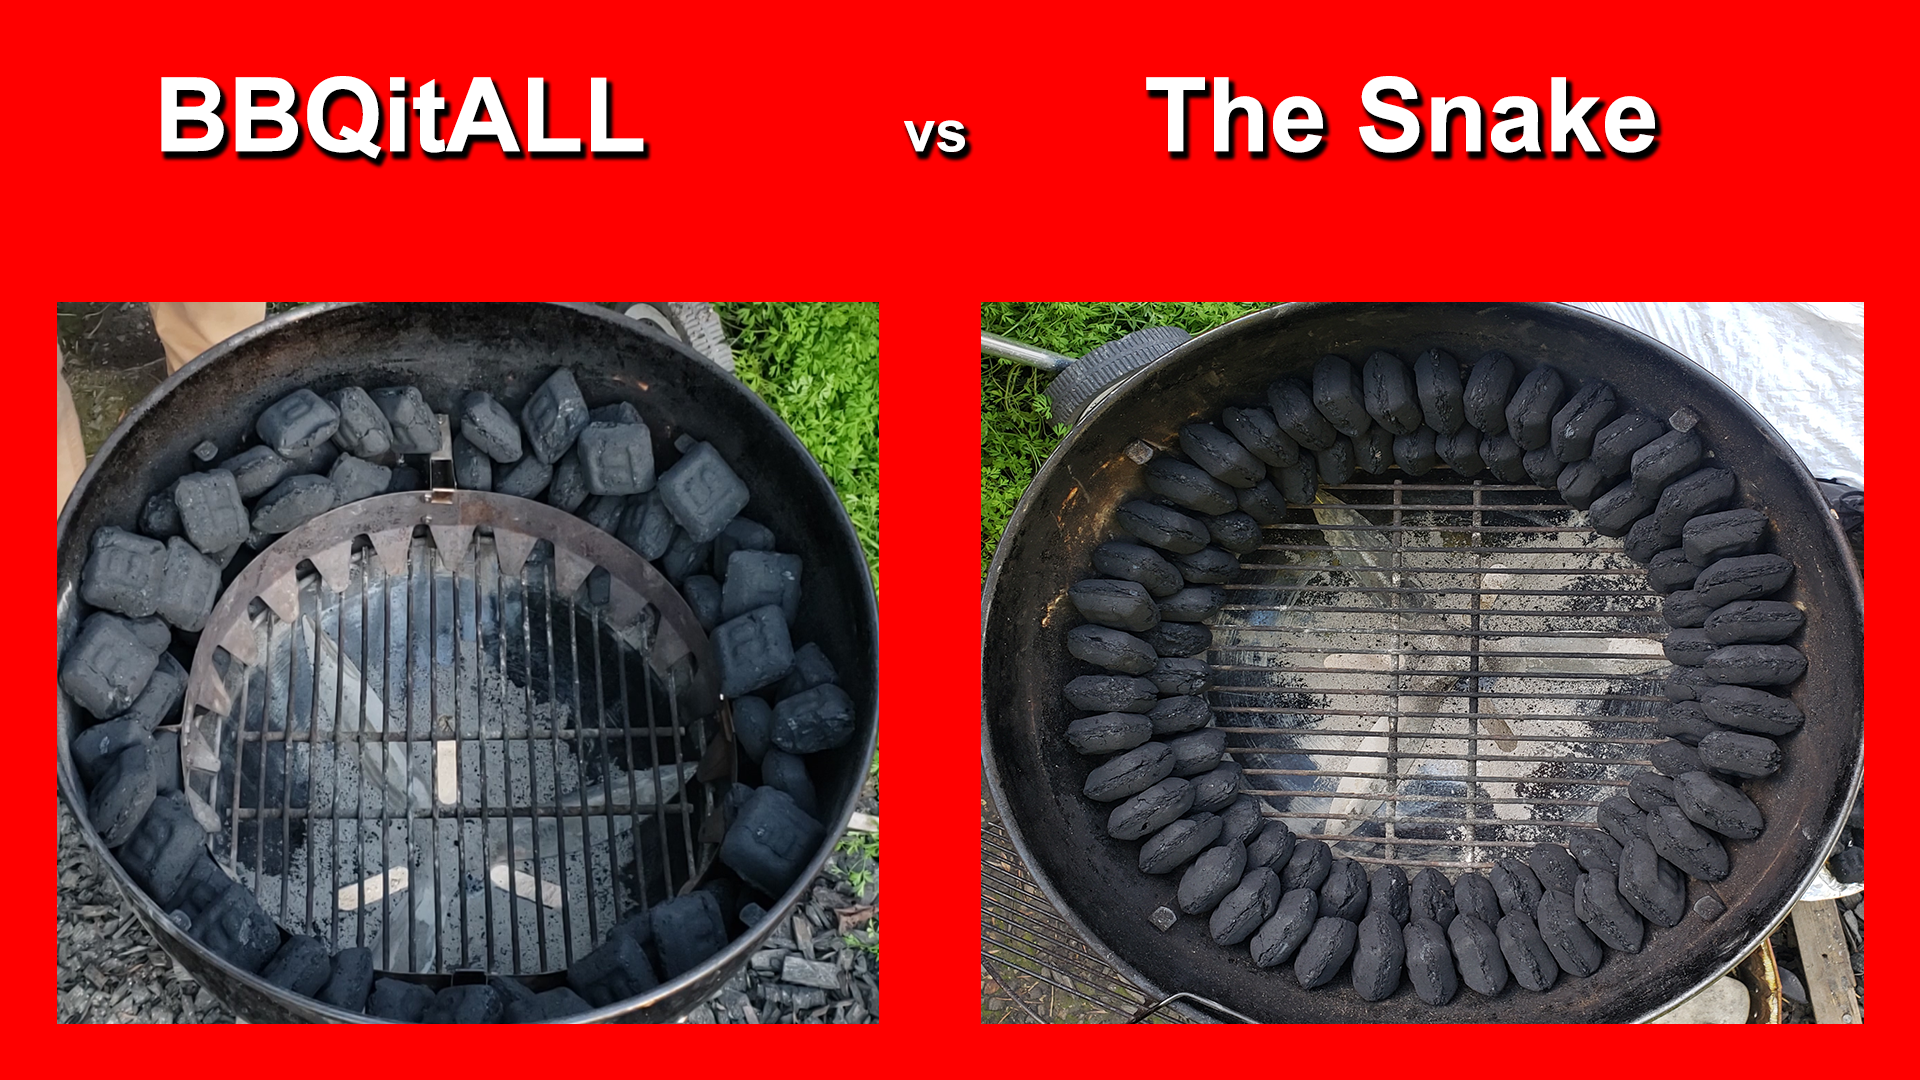
22” kettle with 78 B&B briquettes set up in the BBQitALL Ring 22” kettle with 78 B&B briquettes set up in the snake method
Summary: Feel free to skip to my summary at the bottom if you're pressed for time.
I know that this test is going to generate a lot of discussion due to the passion people have for their method. My goal here is to do my best in providing an apples to apples test as much as possible. Am I biased? Of course! But that said, I think you will find the information useful in whatever method you end up using!
We tested BBQitALL against the snake method by keeping all variables as much the same as possible. My goal was to see which method cooks cleaner, longer and which provided the most room. I recorded the results in a chart below. In short, the BBQitALL had advantages because it:
Burned cleaner and more completely, although 1/2 hour shorter. See the chart below for the reason for the shorter time.
Got up to 225F cooking temperature faster
Provided more cooking room
Was much quicker, easier and cleaner to set up
Could adjust to a wider range of temperatures
How we conducted the test:
We wanted this test to be as close to apples to apples as possible, so for both tests we:
Used the same total number of briquettes. Yes, BBQitALL also had 78 coals. The rings wall allow them to stack higher.
Lit the same number of briquettes (11) to start the fire path
Used the same 22” weber kettle
Used the same vent openings: Top vent was 100% open. Temperature was controlled with the bottom vent only. See “temperature range and adjustment” below for why.
The same time of day and temperature: Outside temperature ranged between 45 and 65 F
Maximized the cooking room as much as each method would allow. Luckily, both the ring and the snake were able to burn at similar temperatures with a 1X2 pattern (1 wide by 2 high)
The same type of briquettes: We used B&B competition oak and hickory
The same probe and internal mass to mimic the 10 pound mass of a piece of meat (rocks and a sweet potato for the probe)
Results Chart: Items with a green bckground did better
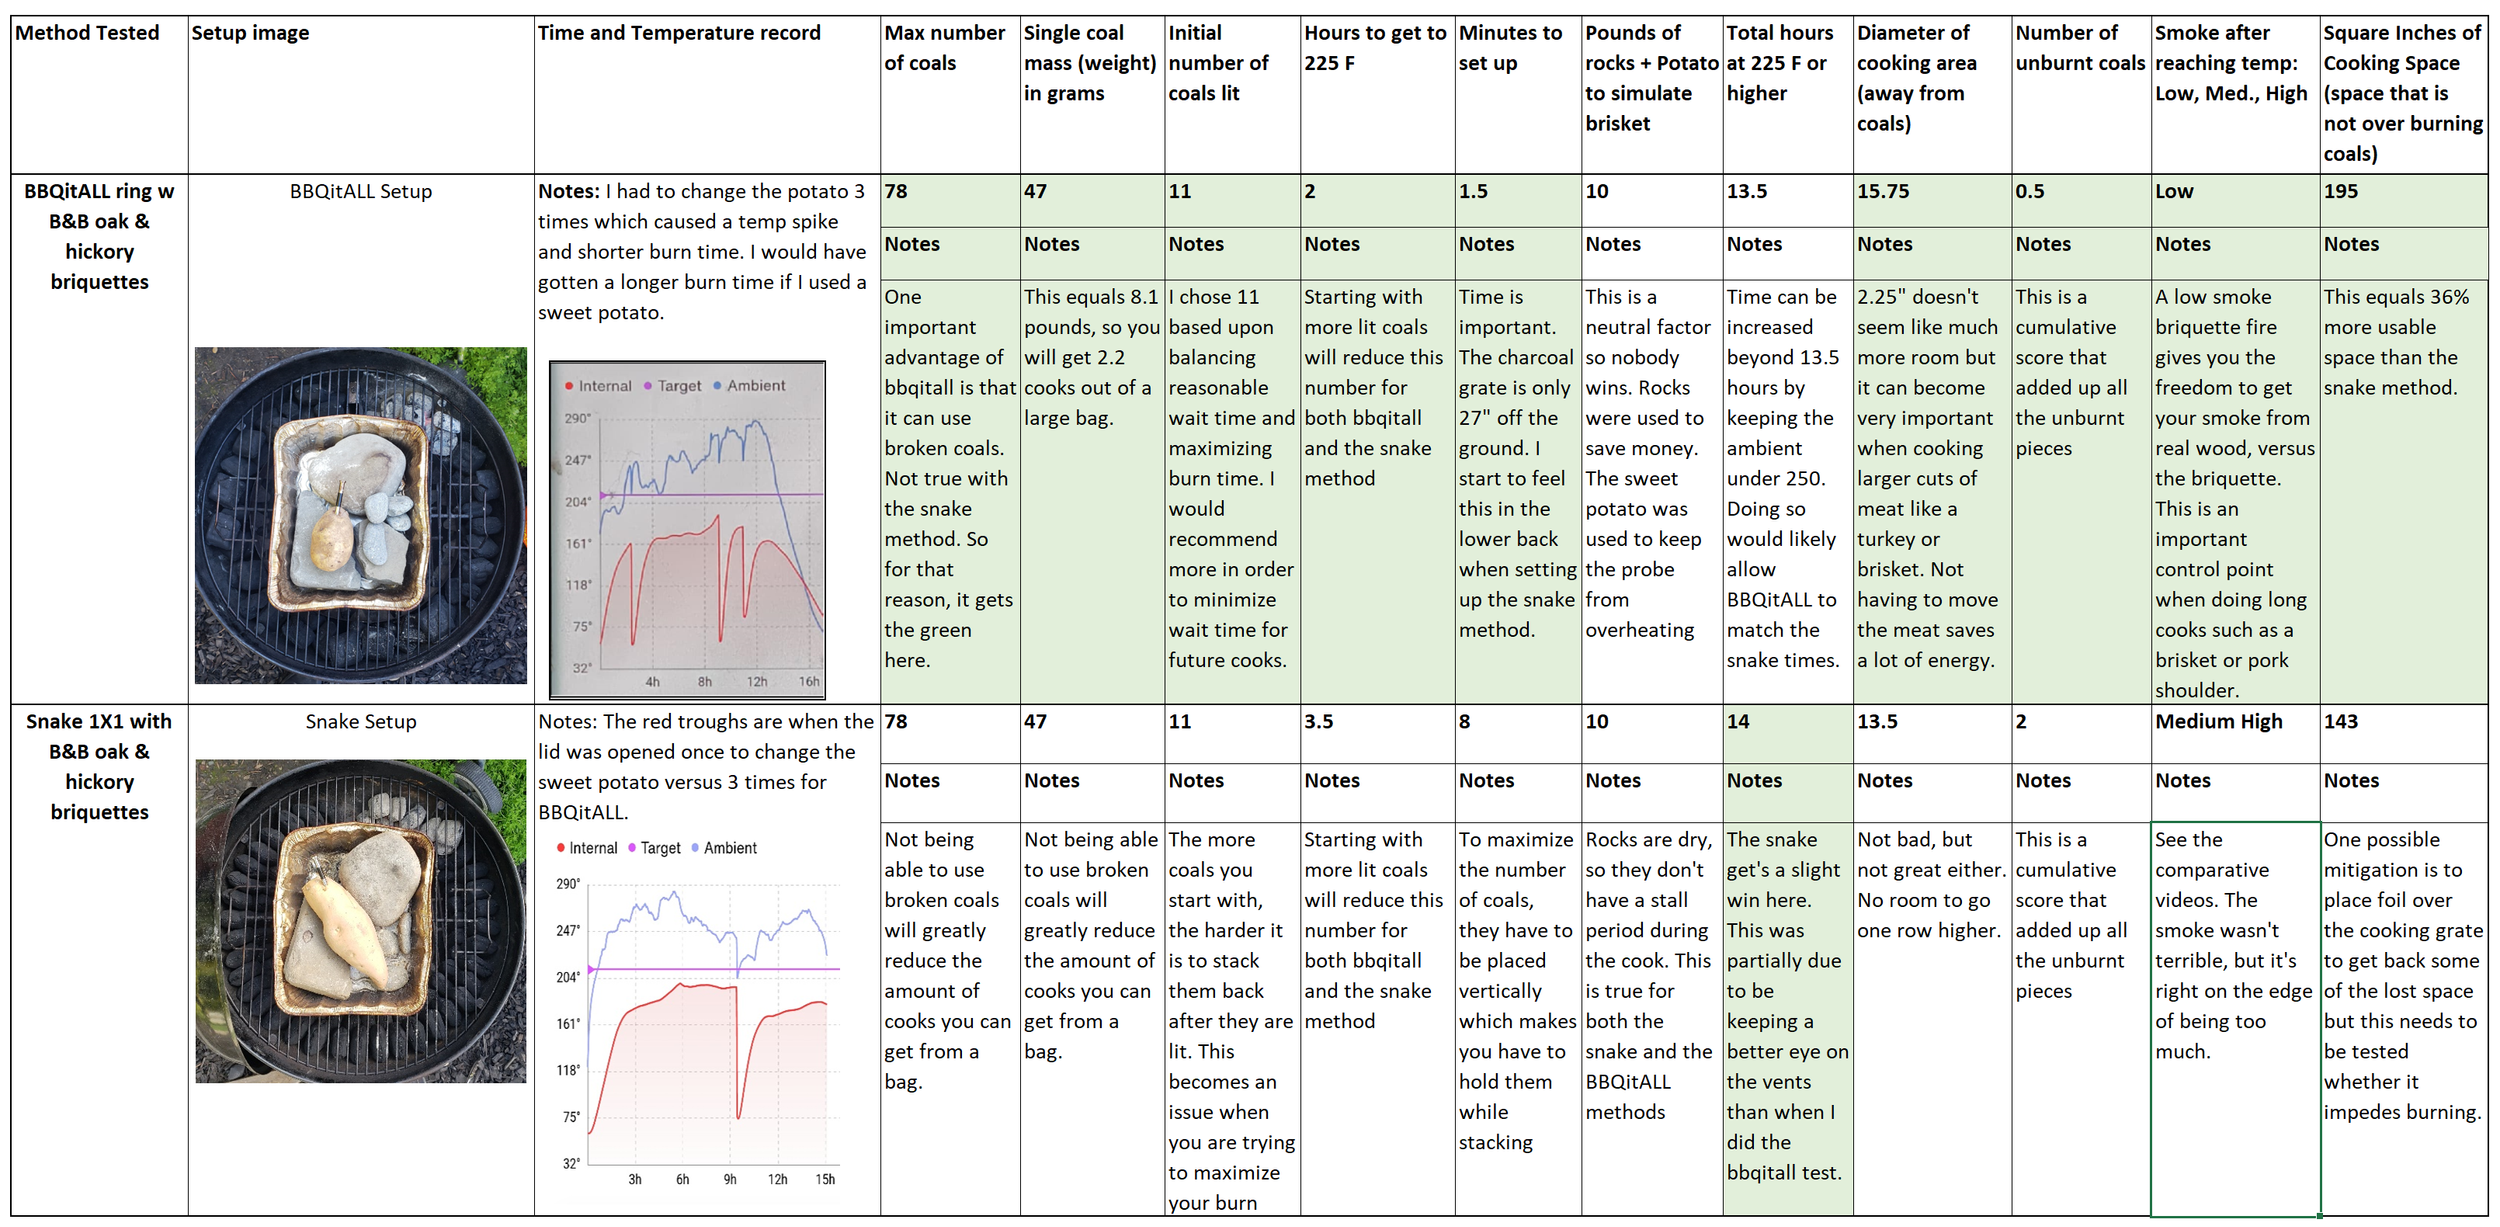
Refer to the chart above for all descriptions below. Areas with a green background did better. See notes to understand our rationale
Process:
To save the $200 cost of buying two briskets, we used rocks to simulate the meat and used a potato to put the probe into to keep it from overheating. We’ve done this before and the only difference between the meat and the rocks is that the rocks make the ambient temperature about 15 degrees hotter than the meat due to the meat’s evaporation. We double checked the ambient temperature between our wireless probe and the wired probe and the wired probe read about 8 degrees hotter than the ambient. We recorded the probe temperatures in the chart above.
Smoke:
I took a video of the smoke both methods reached around 225 F. The smoke you see below was pretty consistent throughout the cook. The snake method was consistently smokier during the whole cook, regardless of the vent opening. I think that was because the snake leaves very little room between the coals, which reduces the airflow. I could really see the difference when I opened the lid. The BBQitALL ring had a more pronounced red glow while the snake was duller. For me, I would rather have the cleanest burn possible and control the smoke with added wood chips or chunks of my choice, rather than getting my smoke from the charcoal only. Briquettes are shaped to maximize airflow when they are tumbled into place. Stacking them reduces the space they are designed to have.
Live videos of smoke for both methods. BBQitall (above) and The snake method (above)
Getting to 225 F
The snake took a full 3 hours to hit 225 F versus BBQitALL’s 2 hours. Both of these took longer than I wanted. The long time was because the rocks were cold (45 degrees) when put in. I normally start BBQitALL with 16 coals because they are smaller than B&B. In the future, I need to dial in the amount of coals used depending on their size.
Grill Space:
This is the distance (diameter) across the grill that’s not above the coals. BBQitALL is 15.75” across and the snake was 13.75”. You might be able to get the snake a little larger by using a smaller briquette and stacking it 3 high instead of 2 (1X3), but that would be pretty unstable and more likely to fall over. Now 15.75” and 13.75” don’t sound much different, but that’s a 33% reduction in area for the snake. This can be the difference between your brisket, pork shoulder or ribs fitting or not. It’s really important that you are sure your meat will not be directly over lit coals during the cook to avoid flareups that can ruin your cook. It’s true that you can open the lid and move the meat, but doing so will cause your BBQ and meat to lose temperature and lengthen the cook. You can clearly see how badly the temperature dropped in the chart above each time I had to change the potato for the probe.
Temperature Range and vent adjustment:
The snake temperature dropped below 225 F at about 8 hours into the cook on it’s own, but came back up again on it’s own. After both the BBQitALL ring and the snake hit 225 F, I adjusted the bottom vent down to about only 1/8” open and left them there. I used a very large sweet potato for the temperature probe for the snake which made so I only had to open the lid for the stake test once. This helped it burn longer. I used a potato for the BBQitALL which made me have to change it twice to keep it from ruining my probe. That caused the fluctuations you see in the chart and the shorter burn time. If I was able to keep the BBQitALL ring closed the entire time, I would have gotten about 14 hours of time above 225 F.
I kept the top vent’s completely open for both the snake and BBQitALL. I try to never close the top vent unless I have to. Closing the top vent too much can let smoke and C02 accumulate to the point that it lowers the oxygen and the quality of the fire. I didn’t have to close the top vent at all for either test in order to achieve the temperatures you see in the chart above.
Charcoal and Stacking Method:
I did a lot of research using different charcoal and stacking methods to find the very best snake method to go up against the BBQitALL ring. By far, the best snake method I found was the vertical B&B method demonstrated by “Cookin Wid Kunchi” on YouTube This method maximized space, was relatively easy to set up and burned consistently with minimal smoke. There may be other methods that burn longer or hotter, but Kunchi’s method was by far the best all around. If there are others you like better, please let me know. Kunchi’s method also allowed me to match the amount of coals used by BBQitAll. That all said, even Kunchi’s method was a literal pain in the back to set up. As you may know, the charcoal grate on the 22” kettle is only about 20” off the ground, so the more time you spend bent over it, the harder it is on your back. Having to use both hands in that position was about all I could take for the relatively short time of 6 minutes it took to set up. For most first timers, I would say to double that time. Not fun. With BBQitALL you just pour them into the ring directly from the bag and then throw in the ones that missed.
Both BBQitALL and the Snake method require just about an 1/8” crack of the bottom vents to maintain a good smoking temperature. My 26” is doing a photo bomb in the background.
Results:
I’m sure that this conversation is not over. As you know, “he who frames the question, wins the debate” That said, I tried to pick the things that I feel would be important the average backyard user. You may have different things that are important to you.Let me know if I missed any big ones. Thanks. I’m going to get a ton of good ideas from you after viewing this. All I ask is that you be kind! Thanks.
For me, the three most important things to measure were the ease of setup, the amount of cooking area and total hours I can get without having to change the coals.
Ease of setup Winner: BBQitALL. Set up in a quarter of the time compared to Building a ring. Ease of set up usually does not seem like a big deal until you actually have to do it. Aside from the stacking mentioned above, another thing that’s harder about the snake is adding the lit coals to it. If you pour them on without adjusting them, they may not light the adjacent coals properly. Also, if you don’t push them to the side of the kettle, they may be under your meat, which can cause flareups.
Cooking Time Winner: Tie. They both cooked about the same amount of time. The amount of cooking time you get is also really important. but just as important was the quality of the heat and amount of smoke. In that category BBQitALL is the winner. Nothing is more frustrating than having to add more charcoal in the middle of a cook. That’s why I invented BBQitALL in the first place. When cooking Thanksgiving turkey to make more room in the kitchen, I was constantly worried about whether I had time to finish the Turkey, rolls and stuffing I did all in the Weber.
Cooking Space Winner BBQitALL. BBQitALL gives approximately 30% more cooking area according to my calculations. And that’s with the single row set up shown above. The number is even better if you compare it to the more common 2 row method. A large cooking area really maximizes the confidence that you won’t have flareups during your cook, which keeps you from having to check your food at all. You can simply trust your probe. Not opening your kettle during a cook turbocharges your cooking time. As they say, if you’re lookin, You're not cookin! A long, consistent burn time allows me to skip the crutch method on briskets completely, which is a huge time saver and allows better bark development. So, although the snake method remains a tested way to do low and slow , I think BBQitALL maximizes more of the factors that will give you the best chance at success.
Since we’re talking about brisket, I will be creating a video done earlier this year where I smoked a 10 pound brisket to perfection using the BBQitALL charcoal ring. The special thing about that cook was that I never opened the kettle once during the entire 12+ hour cook! This allowed me to do a true Texas style brisket with no crutch (wrapping in foil or paper) in the same day I served it. The only problem is that my cooking skills are currently better than my video skills, so it will take quite a bit of editing to make it fit for the web. Stay tuned. I hope to get that done before end of spring 2026. Correction, end of Summer 2026.